As I've started working on JMeter and I thought it would be good to share it on blog rather than keeping it with myself. OK, so first thing I want everyone to understand the basic components that are used in JMeter, the below picture can (as picture is worth a thousand words) help you understand it and you have to get used to JMeter jargon before we start off with any basic preparation. I would like to call the pic as JMeter-Halo as it give basic idea about the components of what we use -
JMeter Halo:
Now, let us dig in, in the example I've taken a W3Schools web service to build the test plan in JMeter rather than developing my/our own web service and deploying it in the server, this will save us some time. Web service WSDL is hosted at link W3Schools Temperature converter. I hope you are able to install and launch JMeter successfully and this is the prerequisite.
The main flow can be achieved with below 5 steps -
- We will add the WSDL to JMeter and will send first request for 1st Method CelsiusToFahrenheit using WebService(SOAP) request sampler.
- We get the response and parse the Response for the output fahrenheit value using XPath Extractor. We will have to provide XPath Query
- We store the output fahrenheit value in a user defined variable.
- We will send this output fahrenheit value in second method request of FahrenheitToCelsius using BeanShell Pre-Processor component.
- Verify the response of the second method request.
Steps to create test plan in JMeter -
1. Launch JMeter.
2. Create Thread Group under Test Plan as shown in below screenshot -
3. After adding Thread Group specify below inputs to
- Give some Name to Thread Group
- No.of threads as 2 (that means two users)
- Ramp Up Period as 1 (each thread will be started with a time gap of 1 second)
- Loop Count as 2 (total no.of iterations for each thread/user)
So it will be same as below screenshot -
4. Now after specifying the no.of users, add WebService SOAP Request for 1st Method by Right Clicking on Thread Group -> Add -> Sampler -> WebService(SOAP) Request and modify the request sampler as -
- Specify Name for the request.
- Give WSDL URL in WSDL URL Field.
- Click on Load button. Methods will be displayed in Web Methods drop down. For doing this step check whether you are behind any firewall. If you are behind firewall specify proxy IP and Port value. Specify Proxy IP address in Server Name or IP field and Port value in Port Number field.
- Now select method CelsiusToFahrenheit from Web Method drop down and click on Configure button, JMeter will populate values in the fields.
- Provide Celsius value as 150 and save the test plan and the final request will be as mentioned in the below screenshot.

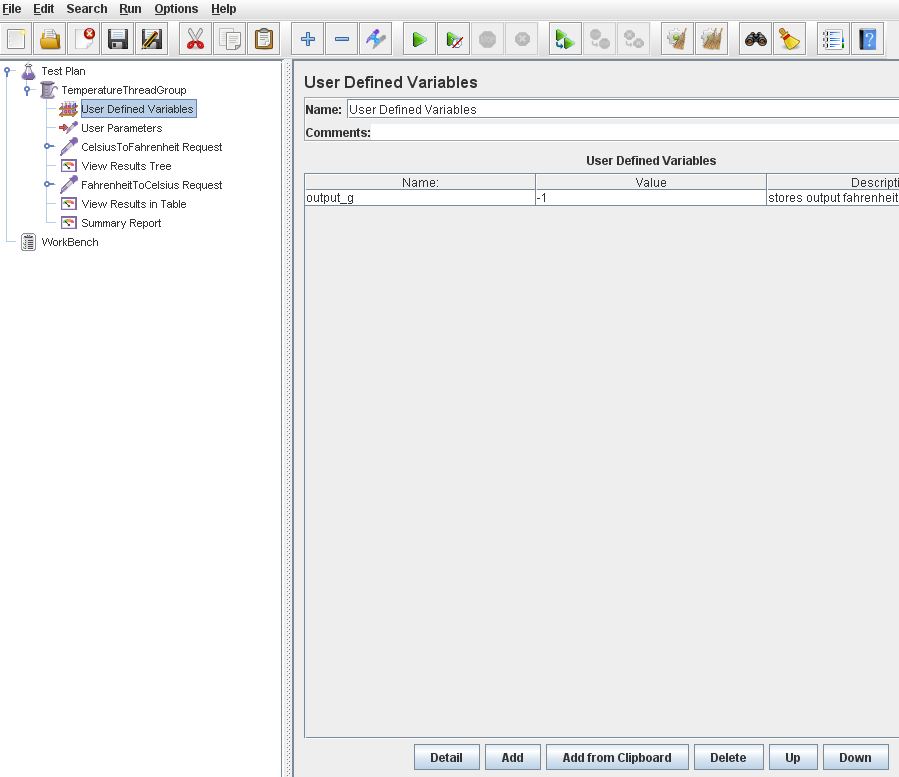
5. Now as mentioned in the main flow, we have to capture the output value from the response so to do this we need User Defined Variables. To add it go to Thread Group -> Config Element -> User Defined Variables. After adding the element, you can add variable by clicking on Add button. Give some name let us say "output_g" will be the variable name, if you wish to put some default value then you can put the value in Value column, any description for the variable then you can put the description in Description column, so after creating variable it will be click as below screenshot -
6. Now you can run the test to check whether Request is in correct format or not, but before you run the test add "View Results Tree" Listener by right-clicking on Thread Group -> Add -> Listener -> View Results Tree. You can also save results to a file.
(check below screenshot)
7. Now go to Run -> Start (or Ctrl + R) to start the run. After the test finishes you can view the result response for each thread in "View Results Tree" as below -
8. we got the results now we have to extract the Fahrenheit value from the response and store it in the variable "output_g", to do this we need to use XPath Extractor. Now right click on CelsiusToFahrenheit Request -> Add -> Post-Processors -> XPath Extractor. We have to use XPath to extract the value from the response. We are using post processor because a post processor will be executed after the request is executed. (Sequence of execution will be pre-processor, sampler element, post processor)
XPath will be -
/Envelope/Body/CelsiusToFahrenheitResponse/CelsiusToFahrenheitResult/text()
Populate variable name "output_g" in Reference Name field. That means XPath Extractor will extract the value from the response and store it in output_g variable.
When XPath fails to extract the value, the default value will be stored in output_g variable. In our case I've put "null" as default value, so when XPath fails it will populate null in output_g variable.
9. Till now we've completed sending first request and capturing response value, now we have to shift to preparing second request to convert Fahrenheit to Celsius. To do this right click on Thread Group -> Add -> Sampler -> WebServie(SOAP) Request. Load the WSDL link which we have used on step 4 and click on Load WSDL button and select FahrenheitToCelsius from drop down and click on Configure button and the values will be populated automatically.
Let the request name be - FahrenheitToCelsius Request
Request structure as below -
<?xml version="1.0" encoding="utf-8"?>
<soap:Envelope xmlns:xsi="http://www.w3.org/2001/XMLSchema-instance" xmlns:xsd="http://www.w3.org/2001/XMLSchema" xmlns:soap="http://schemas.xmlsoap.org/soap/envelope/">
<soap:Body>
<FahrenheitToCelsius xmlns="http://tempuri.org/">
<Fahrenheit>#string#</Fahrenheit>
</FahrenheitToCelsius>
</soap:Body>
</soap:Envelope>
If you observe the request carefully I've used tag "#string#" this is where we have to populate "output_g" value in the request dynamically. To do this we need a pre-processor for this request. So first pre-processor gets executed and then actual request will be sent. To add Bean Shell Pre-Processor, right click on the request -> Add -> Pre Processors -> BeanShell Pre Processor.
Give some meaningful name to it, let us say - FahrenheitToCelsiusBeanShellPreProcessor.
So you may get a question, what is "bean shell"? and the answer is -> BeanShell is lightwieght dynamic java compatible scripting language (just like Groovy Script, which we do it SoapUI tool), you don't have to compile the code every time you change it, everything is taken care during run time and we can also use Java classes here too.
In BeanShell Pre Processor you have to write your script in Script text-area. Below is the script that you have to use to get the value of output_g and replace #string# with output_g value. To get the value of any variable in JMeter we have to use vars.get("variable_name") and to change the value of the variable you have to use vars.put("variable_name","value"). "sampler" is a variable provided by JMeter and refers to the parent WebServiceSampler, in our case it refers to "FahrenheitToCelsius Request" sampler. We get the XML data of the request by getXmlData() method and replace #string# with output_g value. After replacing the value we have to set the new XML data using setXmlData() method.
import org.apache.jmeter.protocol.http.sampler.WebServiceSampler;
// type cast sampler object to WebServiceSampler.
WebServiceSampler ftocRequest = (WebServiceSampler)sampler;
log.info("----------------VALUES WE GOT START-----------------------");
log.info("java global bean shell value= " + vars.get("output_g"));
log.info("----------------VALUES WE GOT END-----------------------");
String replacedRequestXMLString = ftocRequest.getXmlData().replace("#string#", vars.get("output_g") );
ftocRequest.setXmlData(replacedRequestXMLString);
log.info("XML data set" + replacedRequestXMLString);
We can add more listeners to view the consolidated reports of the users like View Results in Table or Summary Report by right clicking on Thread Group -> Add -> Listeners context menu.
You can run the test now and see the results in "View Results Tree" listener as mentioned in the below screenshots.
Request screenshot - #string# is replaced with output_g value.
Response screenshot - 150 is returned in the response.
So that's it! we are able to send the variable value in the second request and get the response. Try it and Learn it!
Happy Learning!