Wednesday, September 12, 2012

JMeter - Distributed testing using JMeter


        This post will help you to configure JMeter servers across various machines. Before we dive into the step-by-step instructions, it's a good idea to define the terms and make sure the definition is clear.


Master – the system running Jmeter GUI, which controls the test.
Slave –  the system running jmeter-server, which takes commands from the GUI and send requests to
the target system(s).
Target – the webserver we plan to stress test.

There will be 1 Master JMeter and Multiple Salves with JMeter Server running on them. Below image will give you some picture -

Copy all JMeter folders to desired slave machines. As part installation of JMeter create environment variables for JMETER_HOME and JMETER_BIN in all the slave machines (even on Master machine).

Step-by-Step

Prerequisites - 

  1. The firewalls on the systems are turned off.
  2. Environment variables are defined for JMeter (JMETER_HOME, JMETER_BIN)
  3. All the machines should be on same subnet. 
  4. Use same version of JMeter to avoid unanticipated errors/issues.

On Slave Machine:

  1. Go to jmeter/bin directory and execute jmeter-server.bat (jmeter-server on unix). If there is any error during server start up check for environment variables related to JMETER, check if the error is related to RMI and check if multiple JRE versions are installed, then do the modifications mentioned from step 2 to 4. else if there is no error during server start up it will be like below screenshot (ignore steps from 2 to 4)-

  2. Open jmeter-server.bat in a text editor
  3. go to line 44 and find “:setCP”
  4. edit “START rmiregistry” to the full path. Example: “START C:\\jre\bin\rmiregistry”

Verification of server on slave machine - 

To check whether server is started successfully or not on slave machine, check below line in jmeter-server.log - (you will know more details from the log )


jmeter.engine.RemoteJMeterEngineImpl: Starting backing engine on

If you do not see this message, it means jmeter-server did not start correctly. (may be due to some firewall blocking RMI Traffic (it can be windows firewall or antivirus firewall)  )


On Master Machine - 

  1. On master system acting as the console, go to jmeter/bin directory open jmeter.properties in a text editor.
  2. edit the line “remote_hosts=127.0.0.1”
  3. add the slave IP addresses. For example, if I have jmeter server running on 10.19.129.38, 39, 40, 41, and 42, the entry would like like this: remote_hosts= 10.19.129.38, 10.19.129.39, 10.19.129.40, 10.19.129.41, 10.19.129.42
  4. Start jmeter.bat to open JMeter master GUI.
  5. Open the test plan you want to use.
  6. Start threads on client machine as mentioned in below screenshot -


To start on all remote slaves (when you have more than one slave), you can select Remote Start All option. Master JMeter will gather results from slaves and display the results using Listeners that are included in the test.

One of the major drawback which I've observed in practice is if you have any config elements which reads data from files, for example CSV Data Config (reading data from CSV), such files will not be sent to Slave machine during running the test. If you have such config elements and you run the test, the test will fail. So such files needs to copied to appropriate folders on Slave Machines. When compared to Load Runner (LR), in LR Controller this will be done automatically.


Thursday, June 21, 2012

JMeter - Overcome/Remove Maximum number of redirects


By Default JMeter performs maximum of 5 redirects, but whenever if your application performs more than 5 redirects JMeter will throw below error during script execution -


Error in JMeter:

Response code: Non HTTP response code: java.io.IOException
Response message: Non HTTP response message: Exceeded maximum number of
redirects: 5


To overcome the error we have to change property value of httpsampler.max_redirects in jmeter.properties file in /bin directory, do the following steps -

1. Change the value of the property to 20
2. Remove # before httpsampler.max_redirects
3. Save the file
4. Restart JMeter

Property value will be as below after the change -

# Maximum redirects to follow in a single sequence (default 5)
httpsampler.max_redirects=20

That's all now JMeter will be able to redirect up to 20 auto redirects.

Happy Learning!!!

Friday, June 15, 2012

JMeter - Passing variable values between two requests or samplers

As I've started working on JMeter and I thought it would be good to share it on blog rather than keeping it with myself. OK, so first thing I want everyone to understand the basic components that are used in JMeter, the below picture can (as picture is worth a thousand words) help you understand it and you have to get used to JMeter jargon before we start off with any basic preparation. I would like to call the pic as JMeter-Halo as it give basic idea about the components of what we use -

JMeter Halo:

Pic Source

Now, let us dig in, in the example I've taken a W3Schools web service to build the test plan in JMeter rather than developing my/our own web service and deploying it in the server, this will save us some time. Web service WSDL is hosted at link W3Schools Temperature converter. I hope you are able to install and launch JMeter successfully and this is the prerequisite. 

The main flow can be achieved with below 5 steps -
  1. We will add the WSDL to JMeter and will send first request for 1st Method CelsiusToFahrenheit using WebService(SOAP) request sampler.
  2. We get the response and parse the Response for the output fahrenheit value using XPath Extractor. We will have to provide XPath Query 
  3. We store the output fahrenheit value in a user defined variable.
  4. We will send this output fahrenheit value in second method request of FahrenheitToCelsius using BeanShell Pre-Processor component.
  5. Verify the response of the second method request. 
Steps to create test plan in JMeter -

1. Launch JMeter.
2. Create Thread Group under Test Plan as shown in below screenshot -

3. After adding Thread Group specify below inputs to  
  • Give some Name to Thread Group 
  • No.of threads as 2 (that means two users)
  • Ramp Up Period as 1 (each thread will be started with a time gap of 1 second)
  • Loop Count as 2 (total no.of iterations for each thread/user)
So it will be same as below screenshot -


4. Now after specifying the no.of users, add WebService SOAP Request for 1st Method by Right Clicking on Thread Group -> Add -> Sampler -> WebService(SOAP) Request and modify the request sampler as -
  • Specify Name for the request.
  • Give WSDL URL in WSDL URL Field.
  • Click on Load button. Methods will be displayed in Web Methods drop down. For doing this step check whether you are behind any firewall. If you are behind firewall specify proxy IP and Port value. Specify Proxy IP address in Server Name or IP field and Port value in Port Number field.
  • Now select method CelsiusToFahrenheit from Web Method drop down and click on Configure button, JMeter will populate values in the fields.
  • Provide Celsius value as 150 and save the test plan and the final request will be as mentioned in the below screenshot.

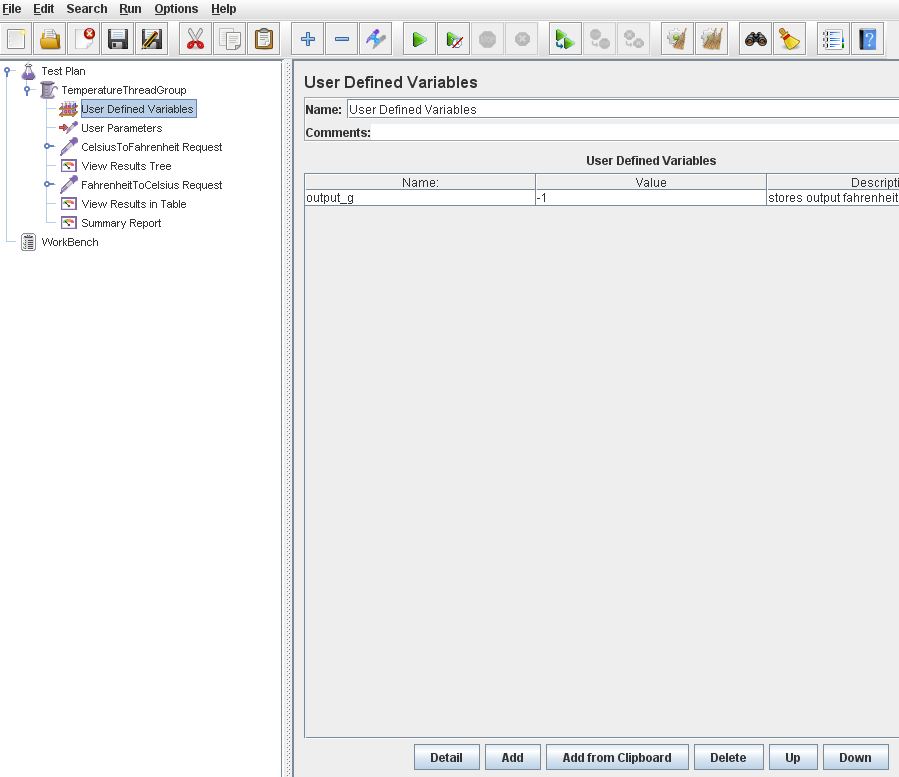
5. Now as mentioned in the main flow, we have to capture the output value from the response so to do this we need User Defined Variables. To add it go to Thread Group -> Config Element -> User Defined Variables. After adding the element, you can add variable by clicking on Add button. Give some name let us say "output_g" will be the variable name, if you wish to put some default value then you can put the value in Value column, any description for the variable then you can put the description in Description column, so after creating variable it will be click as below screenshot - 

6. Now you can run the test to check whether Request is in correct format or not, but before you run the test add "View Results Tree" Listener by right-clicking on Thread Group -> Add -> Listener -> View Results Tree. You can also save results to a file. 

(check below screenshot)


7. Now go to Run -> Start (or Ctrl + R) to start the run. After the test finishes you can view the result response for each thread  in "View Results Tree" as below -


8. we got the results now we have to extract the Fahrenheit value from the response and store it in the variable "output_g", to do this we need to use XPath Extractor. Now right click on CelsiusToFahrenheit Request -> Add -> Post-Processors -> XPath Extractor. We have to use XPath to extract the value from the response. We are using post processor because a post processor will be executed after the request is executed. (Sequence of execution will be pre-processor, sampler element, post processor)

XPath will be - 
/Envelope/Body/CelsiusToFahrenheitResponse/CelsiusToFahrenheitResult/text()

Populate variable name "output_g" in Reference Name field. That means XPath Extractor will extract the value from the response and store it in output_g variable. 

When XPath fails to extract the value, the default value will be stored in output_g variable. In our case I've put "null" as default value, so when XPath fails it will populate null in output_g variable.


9. Till now we've completed sending first request and capturing response value, now we have to shift to preparing second request to convert Fahrenheit to Celsius. To do this right click on Thread Group -> Add -> Sampler -> WebServie(SOAP) Request. Load the WSDL link which we have used on step 4 and click on Load WSDL button and select FahrenheitToCelsius from drop down and click on Configure button and the values will be populated automatically.

Let the request name be - 
FahrenheitToCelsius Request

Request structure as below -

 <?xml version="1.0" encoding="utf-8"?>
 <soap:Envelope xmlns:xsi="http://www.w3.org/2001/XMLSchema-instance" xmlns:xsd="http://www.w3.org/2001/XMLSchema" xmlns:soap="http://schemas.xmlsoap.org/soap/envelope/">
    <soap:Body>
     <FahrenheitToCelsius xmlns="http://tempuri.org/">
       <Fahrenheit>#string#</Fahrenheit>
     </FahrenheitToCelsius>
   </soap:Body>
</soap:Envelope>


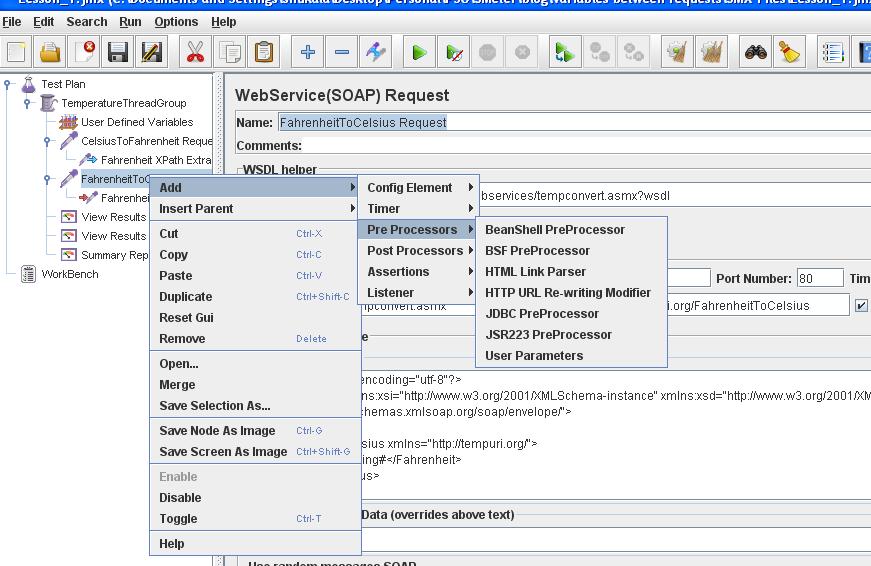
If you observe the request carefully I've used tag "#string#" this is where we have to populate "output_g" value in the request dynamically. To do this we need a pre-processor for this request. So first pre-processor gets executed and then actual request will be sent. To add Bean Shell Pre-Processor, right click on the request -> Add -> Pre Processors -> BeanShell Pre Processor.


Give some meaningful name to it, let us say - FahrenheitToCelsiusBeanShellPreProcessor.

So you may get a question, what is "bean shell"? and the answer is -> BeanShell is lightwieght dynamic java compatible scripting language (just like Groovy Script, which we do it SoapUI tool), you don't have to compile the code every time you change it, everything is taken care during run time and we can also use Java classes here too.

In BeanShell Pre Processor you have to write your script in Script text-area. Below is the script that you have to use to get the value of output_g and replace #string# with output_g value. To get the value of any variable in JMeter we have to use vars.get("variable_name") and to change the value of the variable you have to use vars.put("variable_name","value"). "sampler" is a variable provided by JMeter and refers to the parent WebServiceSampler, in our case it refers to "FahrenheitToCelsius Request" sampler. We get the XML data of the request by getXmlData() method and replace #string# with output_g value. After replacing the value we have to set the new XML data using setXmlData() method.


import org.apache.jmeter.protocol.http.sampler.WebServiceSampler;

// type cast sampler object to WebServiceSampler.
WebServiceSampler   ftocRequest = (WebServiceSampler)sampler; 

log.info("----------------VALUES WE GOT START-----------------------");
log.info("java global bean shell value= " + vars.get("output_g"));
log.info("----------------VALUES WE GOT END-----------------------");

String replacedRequestXMLString = ftocRequest.getXmlData().replace("#string#", vars.get("output_g") );

ftocRequest.setXmlData(replacedRequestXMLString);

log.info("XML data set" + replacedRequestXMLString);


We can add more listeners to view the consolidated reports of the users like View Results in Table or Summary Report by right clicking on Thread Group -> Add -> Listeners context menu.

You can run the test now and see the results in "View Results Tree" listener as mentioned in the below screenshots. 

Request screenshot - #string# is replaced with output_g value.
Response screenshot - 150 is returned in the response.
So that's it! we are able to send the variable value in the second request and get the response. Try it and Learn it!

Happy Learning! 


Sunday, January 31, 2010

URI, URL, URN: Difference between URI and URL

There is lot of confusion between URL, URI and most of the people are still unaware of the distinctions. I started a little research on it. I provided information related to URI, URL, URN. Here we go:

I found the following at the W3C's Contemporary View of Uniform Resource Identifiers:

"...a URL is a type of URI that identifies a resource via a representation of its primary access mechanism (e.g., its network "location"), rather than by some other attributes it may have. Thus as we noted, "http:" is a URI scheme. An http URI is a URL. The phrase "URL scheme" is now used infrequently, usually to refer to some subclass of URI schemes..."

However, as is typical with W3C documents and specs, there's a little too much technical mumbo-jumbo floating around in that explanation to satisfy anyone who doesn't balance their checkbook in binary, so I kept looking. Kenneth Fly's Web Site provided the following:

"URI stands for Universal Resource Identifier and URL stands for Universal Resource Locator. Often times people use the terms interchangably, which is not entirely correct. A URL is a subset of the URI popular protocols. These are protocols (http://, ftp://, mailto:). Therefore all URLs are URIs. The term URL is deprecated and the more correct term URI is used in technical documentation. All URIs are means to access a resource on the Internet and are a a technical short hand used to link to the resource. URIs always designate a method to access the resource and designate the specific resource to be accessed."

So...the terminology is apparently way out-dated and I need to start saying "URI" instead of "URL." Why? Because anything that has been deprecated is bad news.

From various other Sites:

· Whereas URLs always refer to network addresses (including a protocol specification, host name or address, and local path), a URI does not necessarily refer to a remote resource. For example, the URI file:///c:/ specifies a local directory. Because file does not refer to any specific network protocol, this URI is not also a URL. (Check with, A URL is a subset of the URI popular protocols. These are protocols (http://, ftp://, mailto:) as mentioned in the above paragraph)

RFC by Tim Berners – Lee: http://www.faqs.org/rfcs/rfc2396

As mentioned in the RFC 2396, the abbreviation terms Uniform, Resource, and Identifier are straight forward. Tim was conveyed how they divided URI into URL and URN.


Uniform:

Uniformity provides several benefits: it allows different types of resource identifiers to be used in the same context, even when the mechanisms used to access those resources may differ; it allows uniform semantic interpretation of common syntactic conventions across different types of resource identifiers; it allows introduction of new types of resource identifiers without interfering with the way that existing identifiers are used; and, it allows the identifiers to be reused in many different contexts, thus permitting new applications or protocols to leverage a pre-existing, large, and widely-used set of resource identifiers.

Resource:

A resource can be anything that has identity. Familiar examples include anelectronic document, an image, a service e.g., "today's weather report for Los Angeles"), and a collection of other resources. Not all resources are network "retrievable"; e.g., human beings, corporations, and bound books in a library can also be considered resources. The resource is the conceptual mapping to an entity or set of entities, not necessarily the entity which corresponds to that mapping at any particular instance in time. Thus, a resource can remain constant even when its content---the entities, to which it currently corresponds---changes over time, provided that the conceptual mapping is not changed in the process.

Identifier:

An identifier is an object that can act as a reference to something that has identity. In the case of URI, the object is a sequence of characters with a restricted syntax.

A URI can be further classified as a locator, a name, or both. The term "Uniform Resource Locator" (URL) refers to the subset of URI that identify resources via a representation of their primary access mechanism (e.g., their network "location"), rather than identifying the resource by name or by some other attribute(s) of that resource. The term "Uniform Resource Name" (URN) refers to the subset of URI that are required to remain globally unique and persistent even when the resource ceases to exist or becomes unavailable.

To read more: http://www.faqs.org/rfcs/rfc2396.html#ixzz0eAl5m8dL

The important point in URL is the “Network Location” as mentioned in the example which provides the distinction:

For example, the URI file:///c:/ specifies a local directory. Because file does not refer to any specific network protocol, this URI is not also a URL.

Computer scientists may classify a URI as a locator (URL), or a name (URN), or both. A Uniform Resource Name (URN) functions like a person's name, while a Uniform Resource Locator (URL) resembles that person's street-address. In other words: the URN defines an item's identity, while the URL provides a method for finding it.

The ISBN system for uniquely identifying books provides a typical example of the use of URNs. ISBN 0486275574 (urn:isbn:0-486-27557-4) cites unambiguously a specific edition of Shakespeare's play Romeo and Juliet. In order to gain access to this object and read the book, one would need its location: a URL address.

From technical point of view as mentioned in Wikipedia:


A URL is a URI that, in addition to identifying a network homed resource, specifies the means of acting upon or obtaining the representation, through description of the primary access-mechanism, or network "location". For example, the URL http://www.wikipedia.org/ identifies a resource (Wikipedia's home page) and implies that a representation of that resource (such as the home page's current HTML code, as encoded characters) is obtainable via HTTP from a network host named www.wikipedia.org. A Uniform Resource Name (URN) is a URI that identifies a resource by name, in a particular namespace. One can use a URN to talk about a resource without implying its location or how to access it. The resource does not need to necessarily be network homed. For example, the URN urn:isbn:0-395-36341-1 is a URI that specifies the identifier system, i.e. International Standard Book Number (ISBN), as well as the unique reference within that system and allows one to talk about a book, but doesn't suggest where and how to obtain an actual copy of it.